Helpful tips and tricks from the community
Sign in to vote on your favorite tips & tricks
Sign in with a free account to heart options and help the community discover the best gear.
Our team's favorite tips & tricks
If you've used the Helix Stadium XL with the Helix Stadium app enough then you probably and repeatedly ran into this frustrating problem - The connection isn’t always reliable:
Sometimes it disconnects.
Sometimes it won’t reconnect.
Sometimes it only comes back after restarting the app or power-cycling the pedal.
Sometimes it works perfectly… until it doesn’t.
StadiumBridge is what I call my DIY practical workaround that improves reliability by changing how the Stadium XL connects to your network — without relying on its internal Wi-Fi.
StadiumBridge avoids the internal Wi-Fi path entirely.
Instead:
A small external Wi-Fi bridge handles the wireless connection
That connection is converted to Ethernet
The Stadium XL only sees a wired network interface
The Stadium’s internal Wi-Fi is disabled
From the pedal’s point of view, it’s just plugged into Ethernet — which tends to behave more predictably. You still connect to the pedal wirelessly through the Helix Stadium app.
This alone significantly reduces disconnects and makes reconnection far less painful.
You may still need to restart the Helix Stadium app occasionally
You may still need to reboot the pedal sometimes
Saving or editing can feel a bit laggy at times
This is not a guaranteed, foolproof fix
But compared to relying on internal Wi-Fi alone:
Disconnects happen less often
Reconnects succeed more reliably
The setup is far less temperamental
For me, that’s a big win.
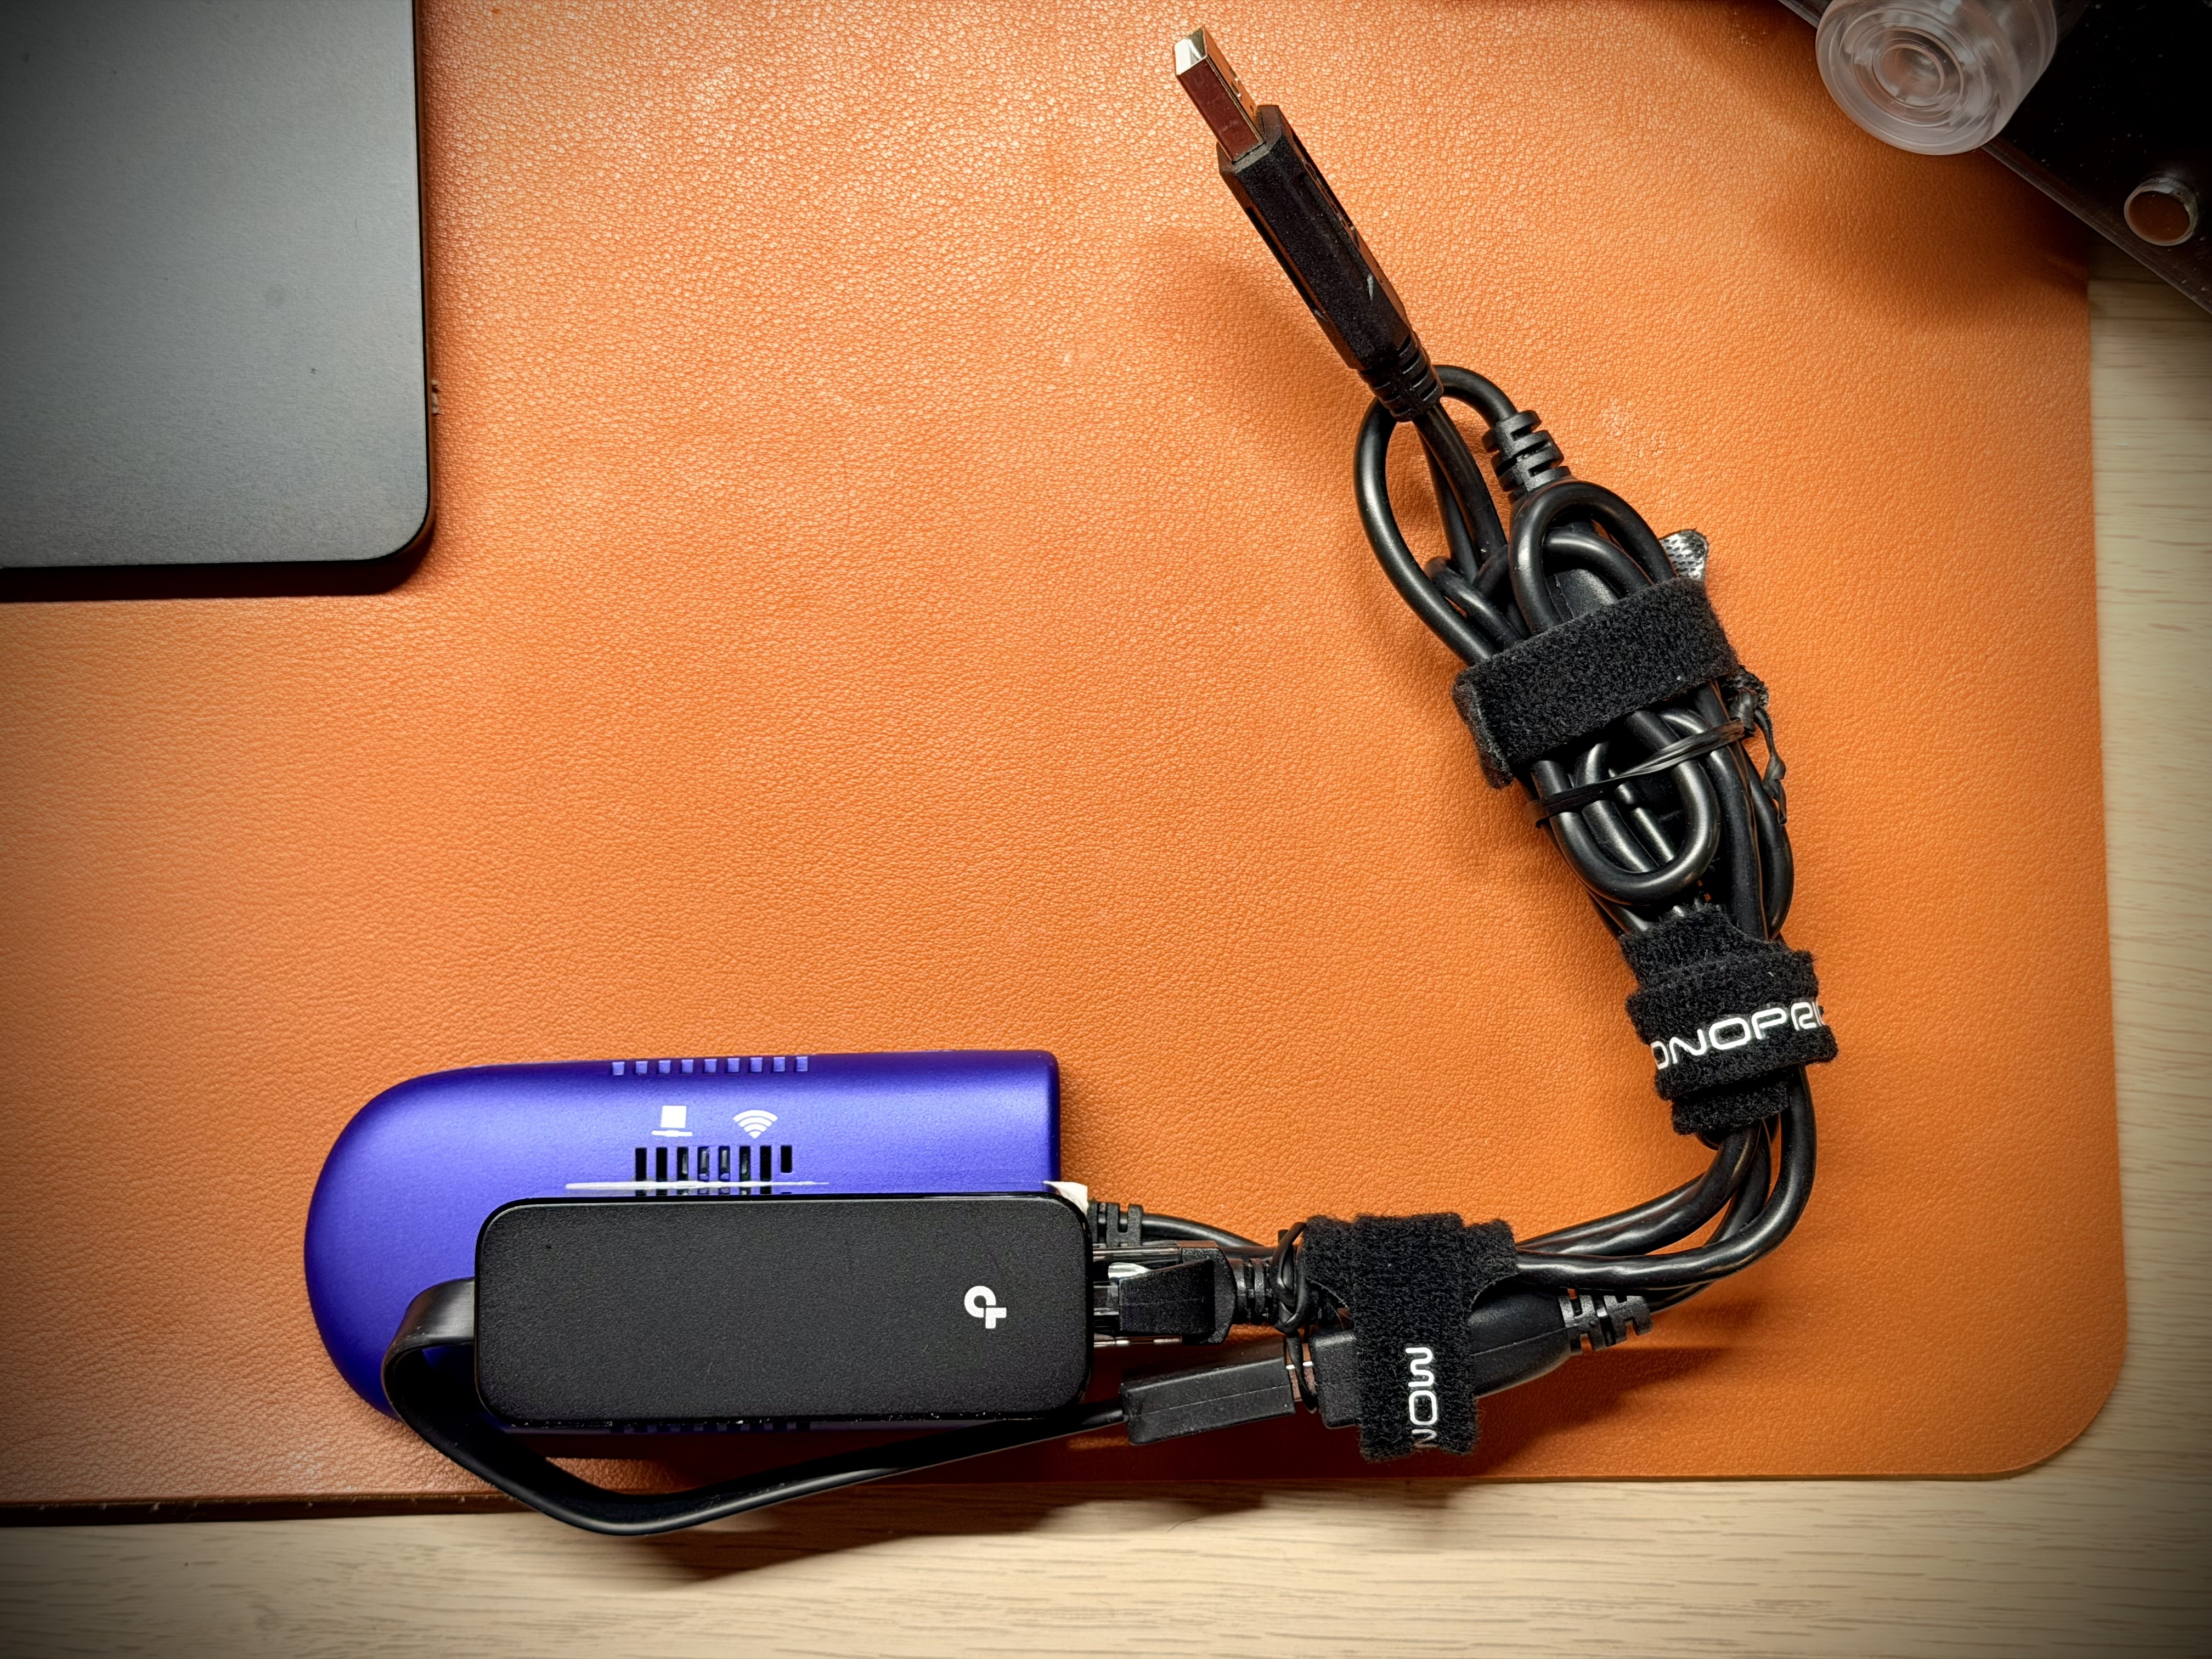
Here’s exactly whats needed to build your StadiumBridge:
https://www.amazon.com/dp/B0C167WM5D
https://www.amazon.com/dp/B09GRL3VCN
https://www.amazon.com/dp/B014SK2H6W
Yes its slower but I intentionally bought this version because::
2.4 GHz for range and consistency
Cheap hardware
If you want to upgrade to a nicer or faster bridge later, you can — the concept stays the same.
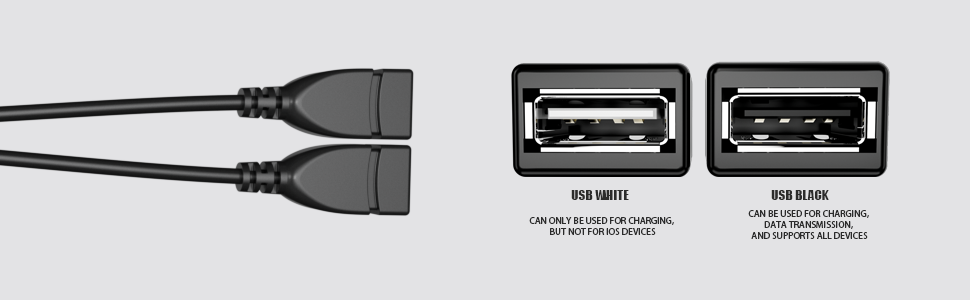
Plug the USB splitter into the Stadium XL
Connect the Wi-Fi bridge to the splitter’s power side (white connector)
Connect the USB-to-Ethernet adapter to the splitter’s data side (black connector)
Connect the bridge Ethernet cable to the the USB-to-Ethernet adapter
Optionally bundle up the wires (I used velcro ties, you can use zip ties or rubber bands)
Connect the splitter USB to the Stadium XL
Disable Wi-Fi on the Stadium
Reboot the Stadium XL
StadiumBridge is an ugly, practical workaround that makes connecting to the Helix Stadium XL wirelessly a little more consistent.
Sometimes “better” is more than good enough.
This is theoretical and untested, but based on the bridge’s specs, it should be possible.
The Wi-Fi bridge used in StadiumBridge supports AP / Hotspot mode, which means it can create its own SSID and hand out local IP addresses.
In theory, this would allow:
The Stadium XL to stay connected via Ethernet (as usual)
The bridge to create a local Wi-Fi network
A laptop or tablet to connect directly to that SSID
Wireless control of the pedal with no venue Wi-Fi and no internet
This would be especially useful at a gig. I use a Surface Go 2 tablet mounted on my stand while I play, and being able to control the pedal wirelessly from that tablet — without relying on any external network — would be ideal.
Important caveats:
This has not been fully tested
Performance may be slower than normal bridge mode
Best treated as a backup or situational option, not a primary setup
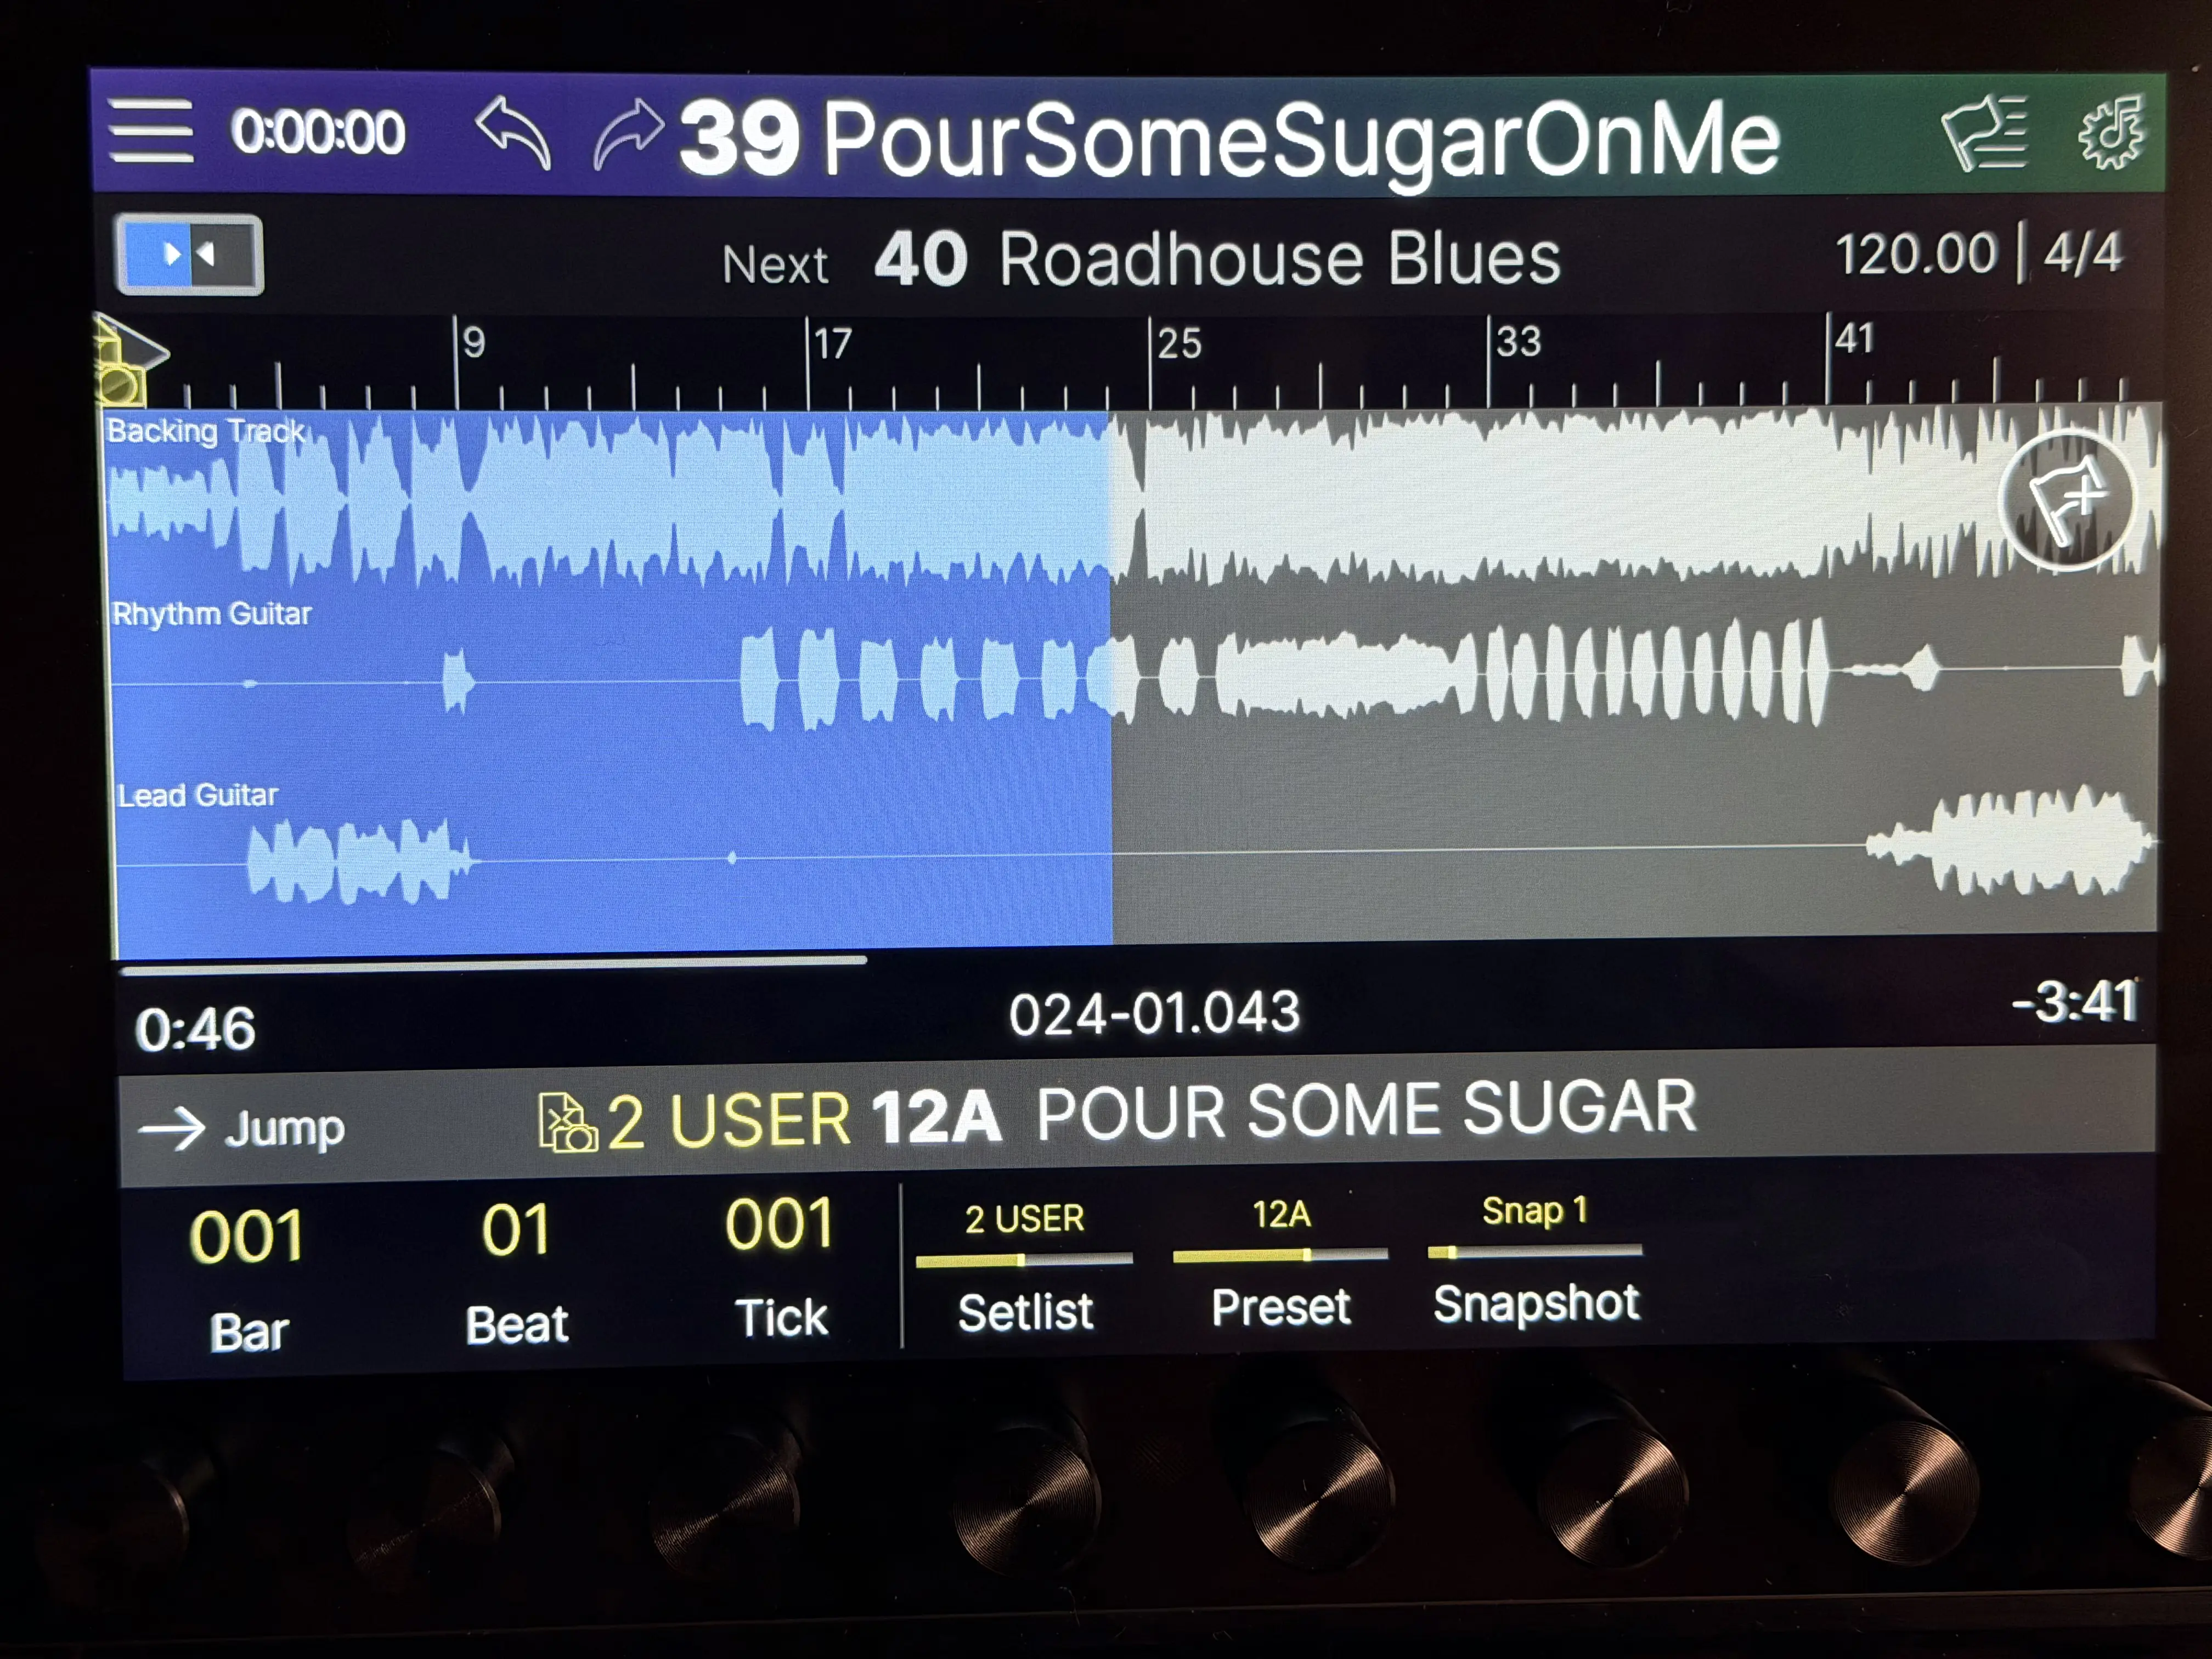
Stadium Showcase makes it easy to practice and dial in presets by letting you play full songs from your pedal, mute all the guitars and play the whole song yourself, mute just the lead or rhythm guitar to work on specific parts, and automatically switch presets and snapshots so you can stay focused on playing and tone.
Here’s how I do it, step by step.
First thing you need is the song as an audio file. Pretty much anything works as long as it’s a real audio file you can upload later.
Stadium and Moises can work with:
MP3, WAV, FLAC, M4A, MP4, MOV, WMA
You already have it
If you’ve bought the song or already have it in your library, you’re good.
Rip it from a CD or other physical media
Old-school, but still one of the cleanest ways to get high-quality audio.
Rip it from YouTube or streaming services
A lot of people use third-party ripping sites or software to grab audio from YouTube or streaming platforms.
Common methods:
YouTube ripping websites or desktop apps
Streaming service rippers
Video-to-audio converters
System audio recorders that capture what’s playing
For best results later, try to get the highest quality version you can. WAV or FLAC is ideal, but a good MP3 will still work.
Once you’ve got the song, the next move is breaking it into stems (ex. extracting the lead guitar track form the song) so you can control what you hear while practicing.
I use Moises.ai for this—it’s great, and like StadiumDepot (wink wink, please support this site), it’s a small monthly or yearly subscription that’s absolutely worth it if you like supporting good tools built by real developers.
Open the Moises desktop app
Use the desktop app, not the web version. The desktop app lets you transpose the song (ex. recording is in Eb but your band plays it in E) and export the corrected audio.
Start track separation
Click Track Separation and drag in your audio file.
Pick your stem setup
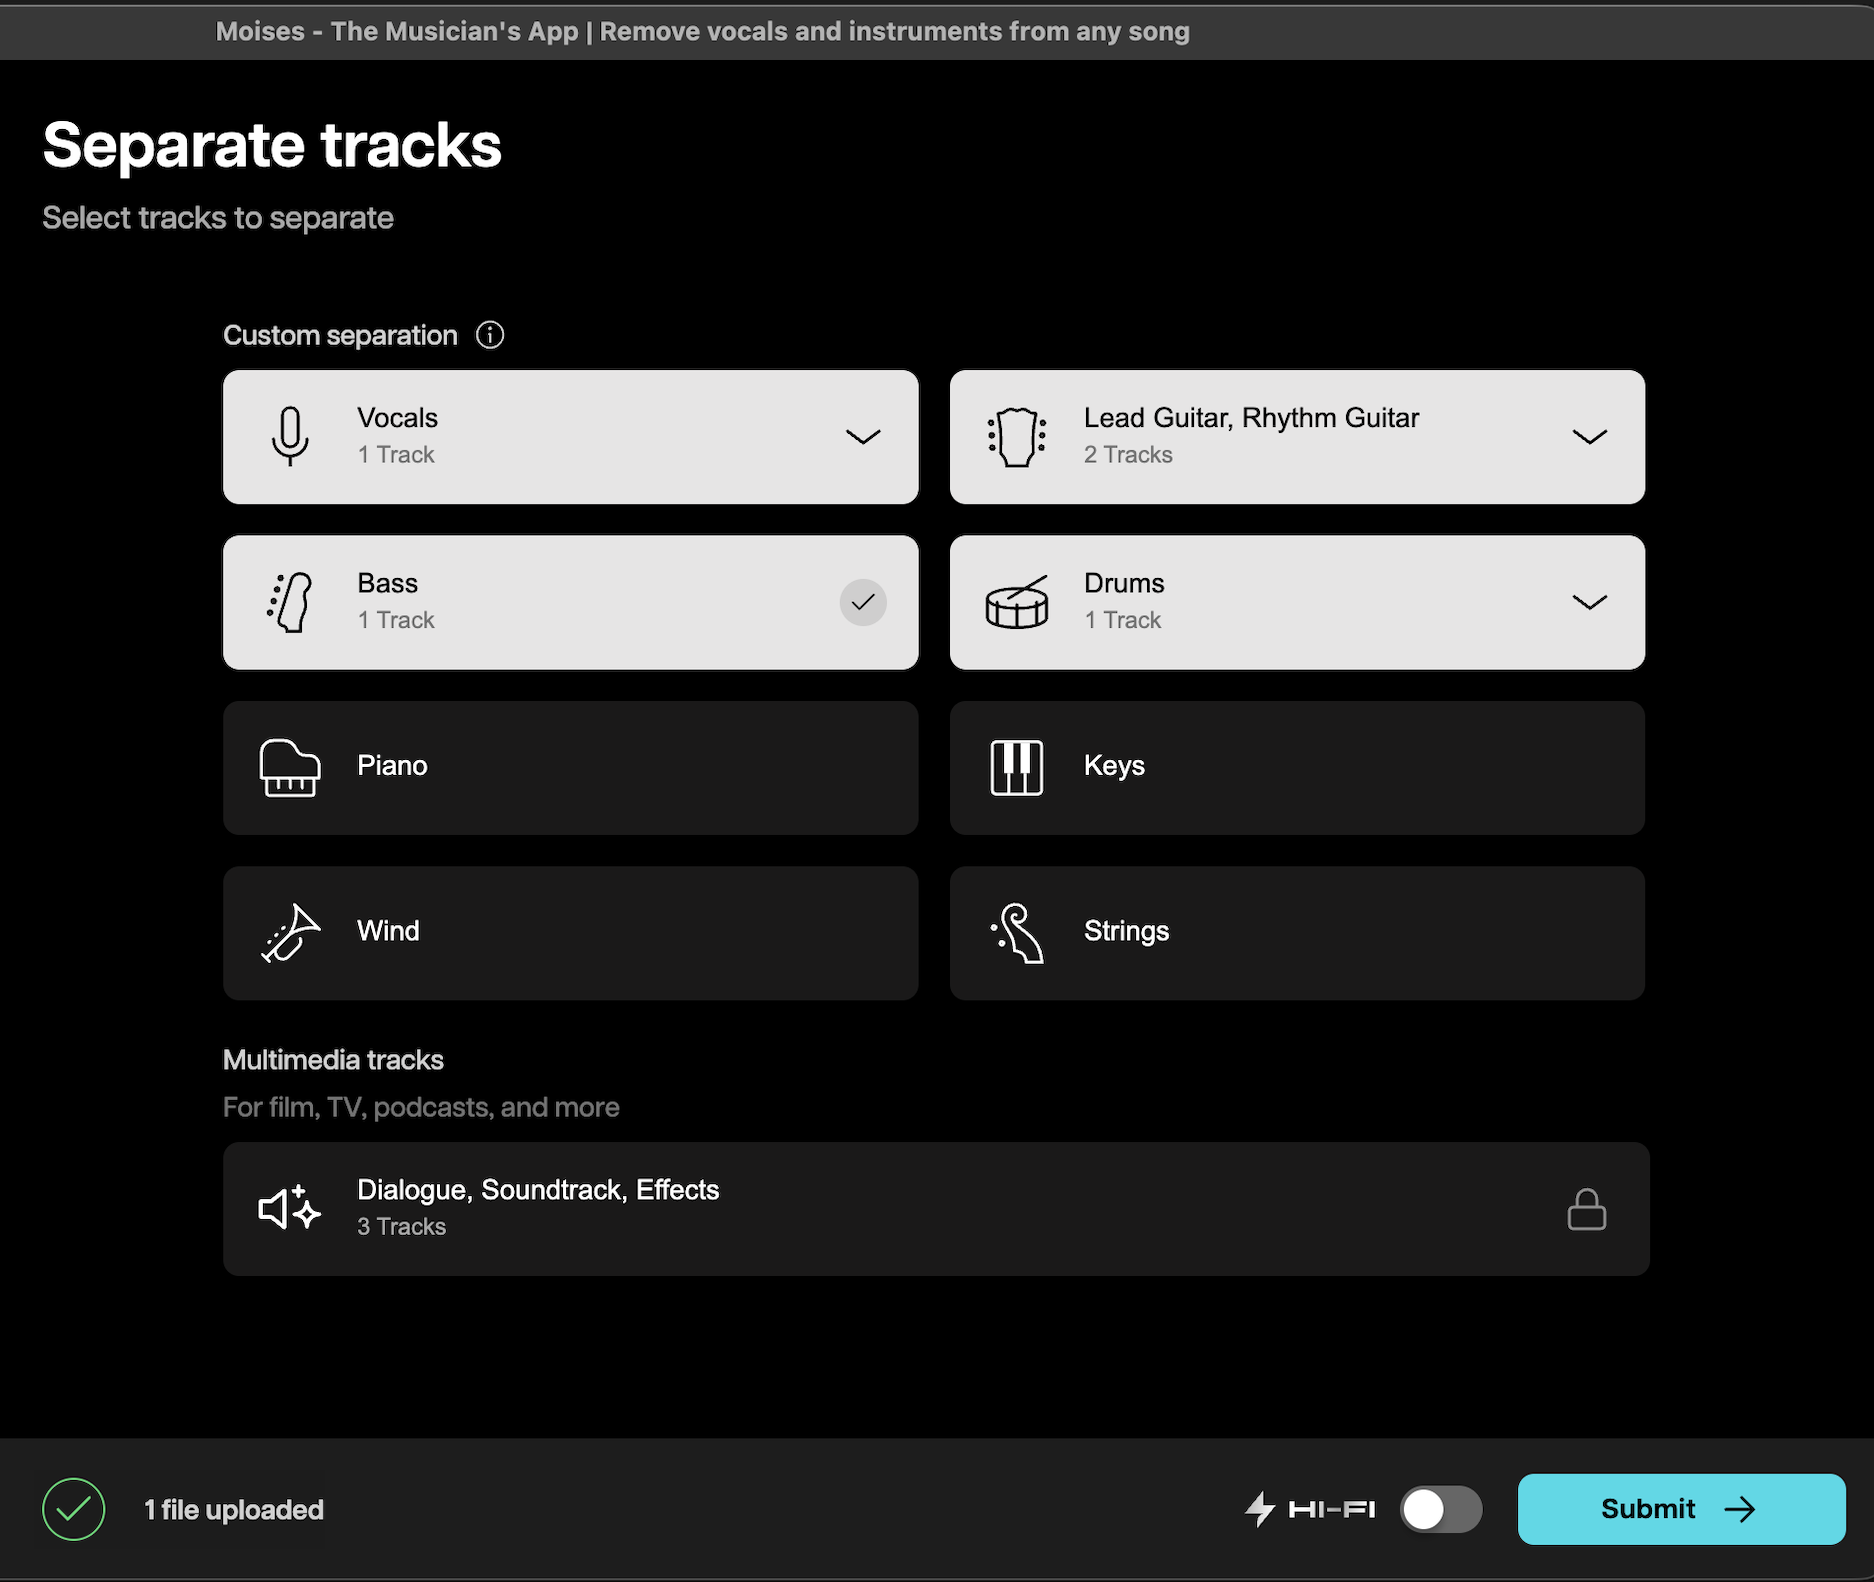
I usually choose:
1 vocal track
1 bass track
1 drum track
1 rhythm guitar track
1 lead guitar track
This separates into the 3 key tracks needed (backing track aka no guitars, rhythm guitar, and lead guitar).
Submit it
Hit submit and let Moises do its thing.
Now comes the important part—exporting the versions you’ll actually use in Stadium.
Set the key and tuning
If the recording is not in your desire key and or tuning, fix that now.

Export the backing track
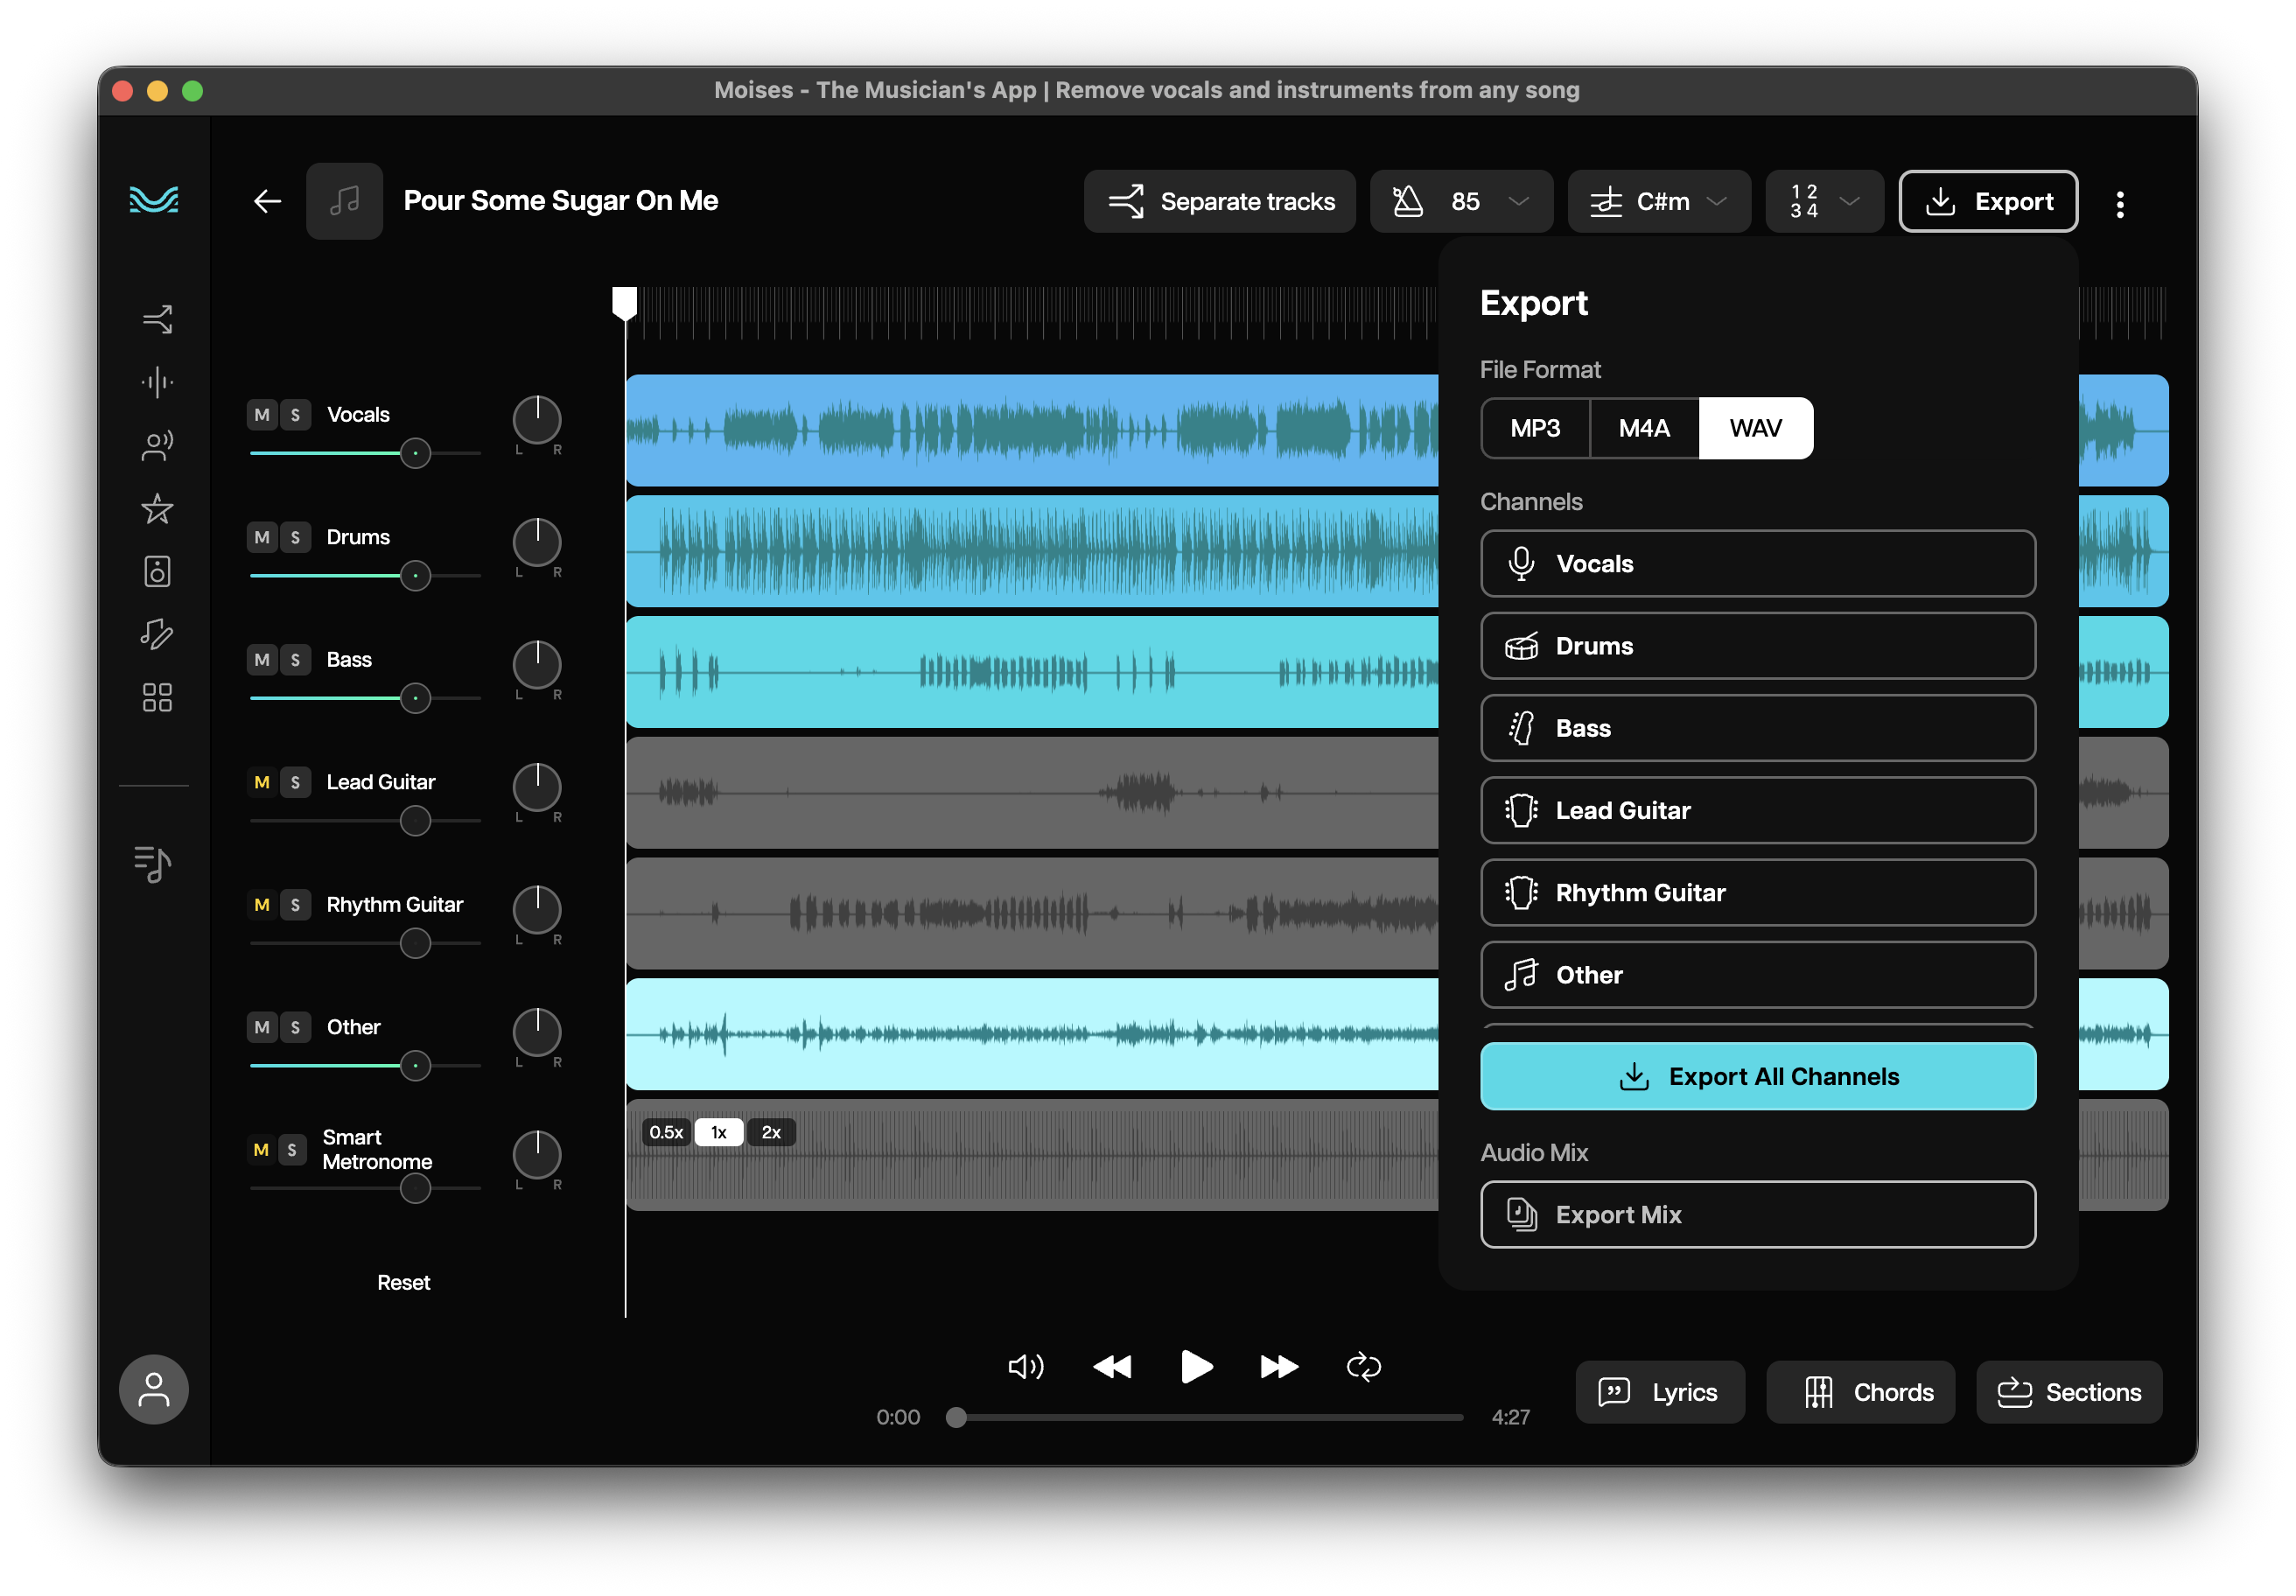
Mute both rhythm and lead guitar
Export the mix as WAV
Export the rhythm guitar track
Solo the rhythm guitar (mute everything else)
Export the mix as WAV
Export the lead guitar track
Solo the lead guitar
Export the mix as WAV
Important:
Use Export Mix, not individual channels. That way the key change, tuning, and volume balances stay intact across all files.
Now you’re ready to get everything into Stadium.
Open the Helix Stadium app
Launch the app and connect to your Stadium pedal.
Open Showcase
Click the Song icon in the top-center toolbar.
Name the song
Keep it simple and recognizable—you’ll be scrolling through this on the pedal later.
Drag in your stems
Drop the WAV files into the Showcase window.
Sort the tracks
I like to keep them in this order:
Backing track
Rhythm guitar
Lead guitar
Click Transfer
This sends the song and all tracks to your Stadium.
Once that’s done, the computer is basically out of the picture.
I hit the Song button on Stadium, pick the song, press play—and that’s it.
From there:
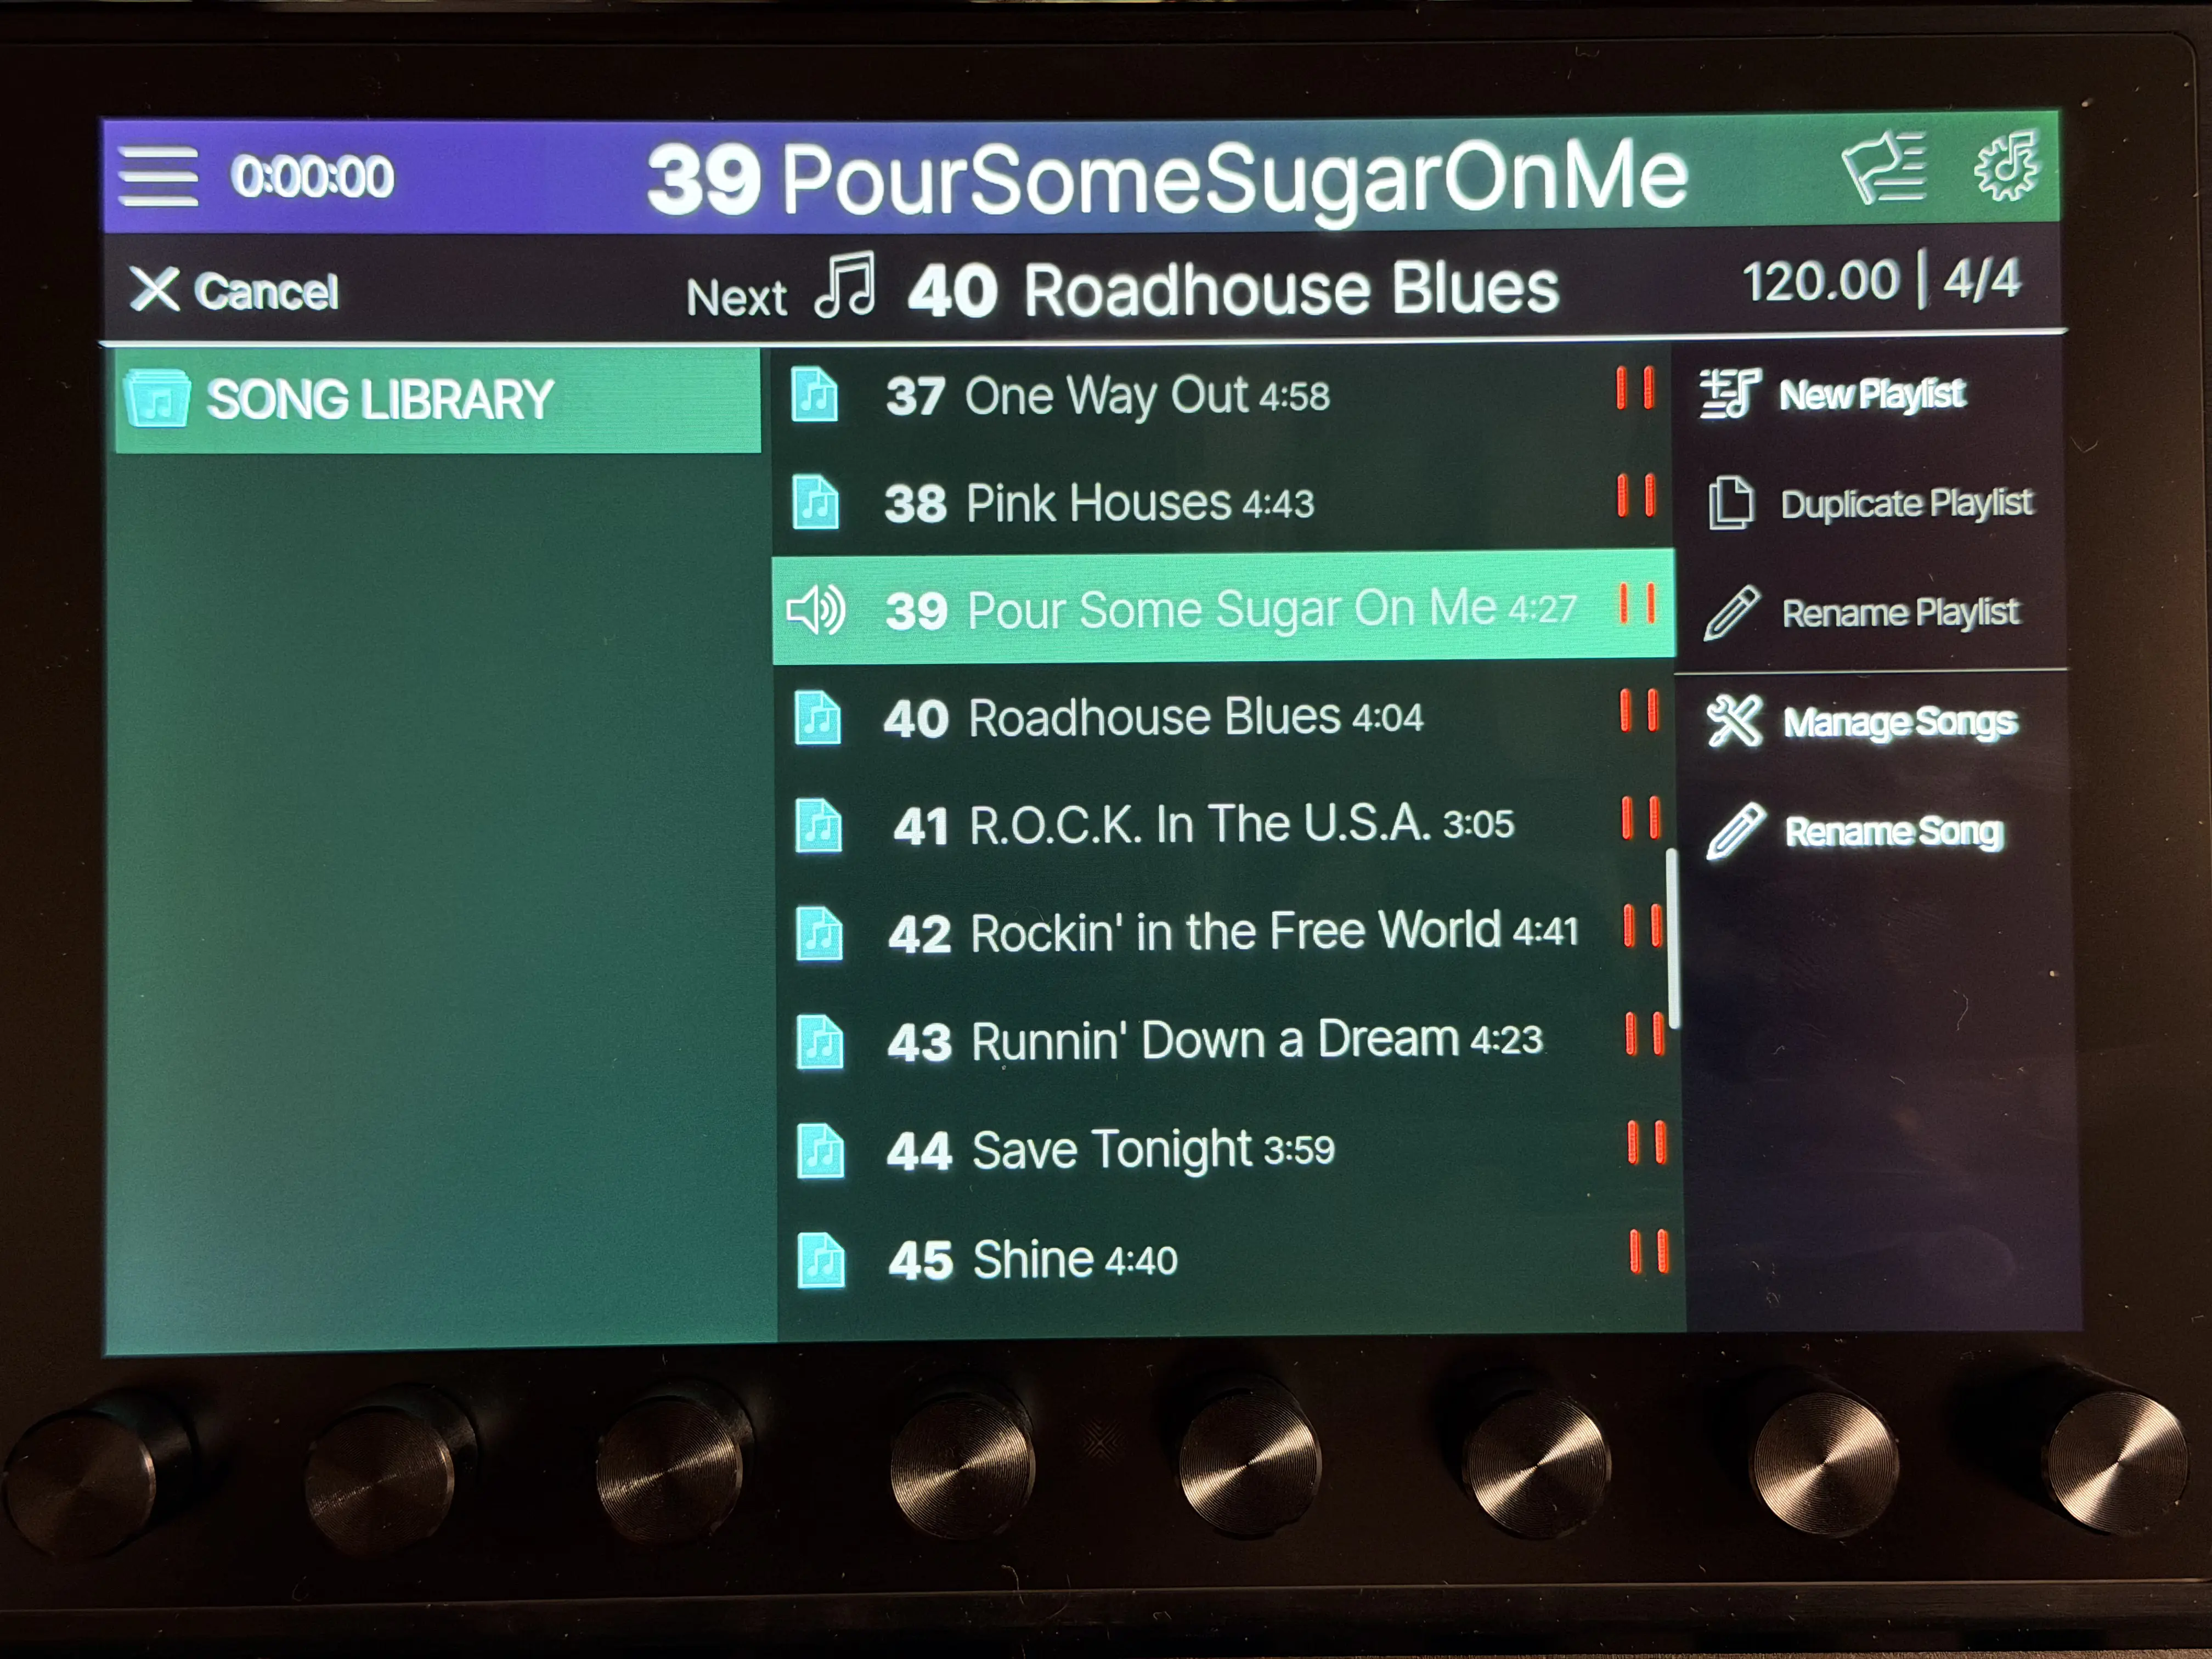
I mute the guitar tracks and play along
I mute backing and rhythm to focus on lead parts
I solo rhythm and practice tight timing
I blend tracks to match rehearsal or live conditions
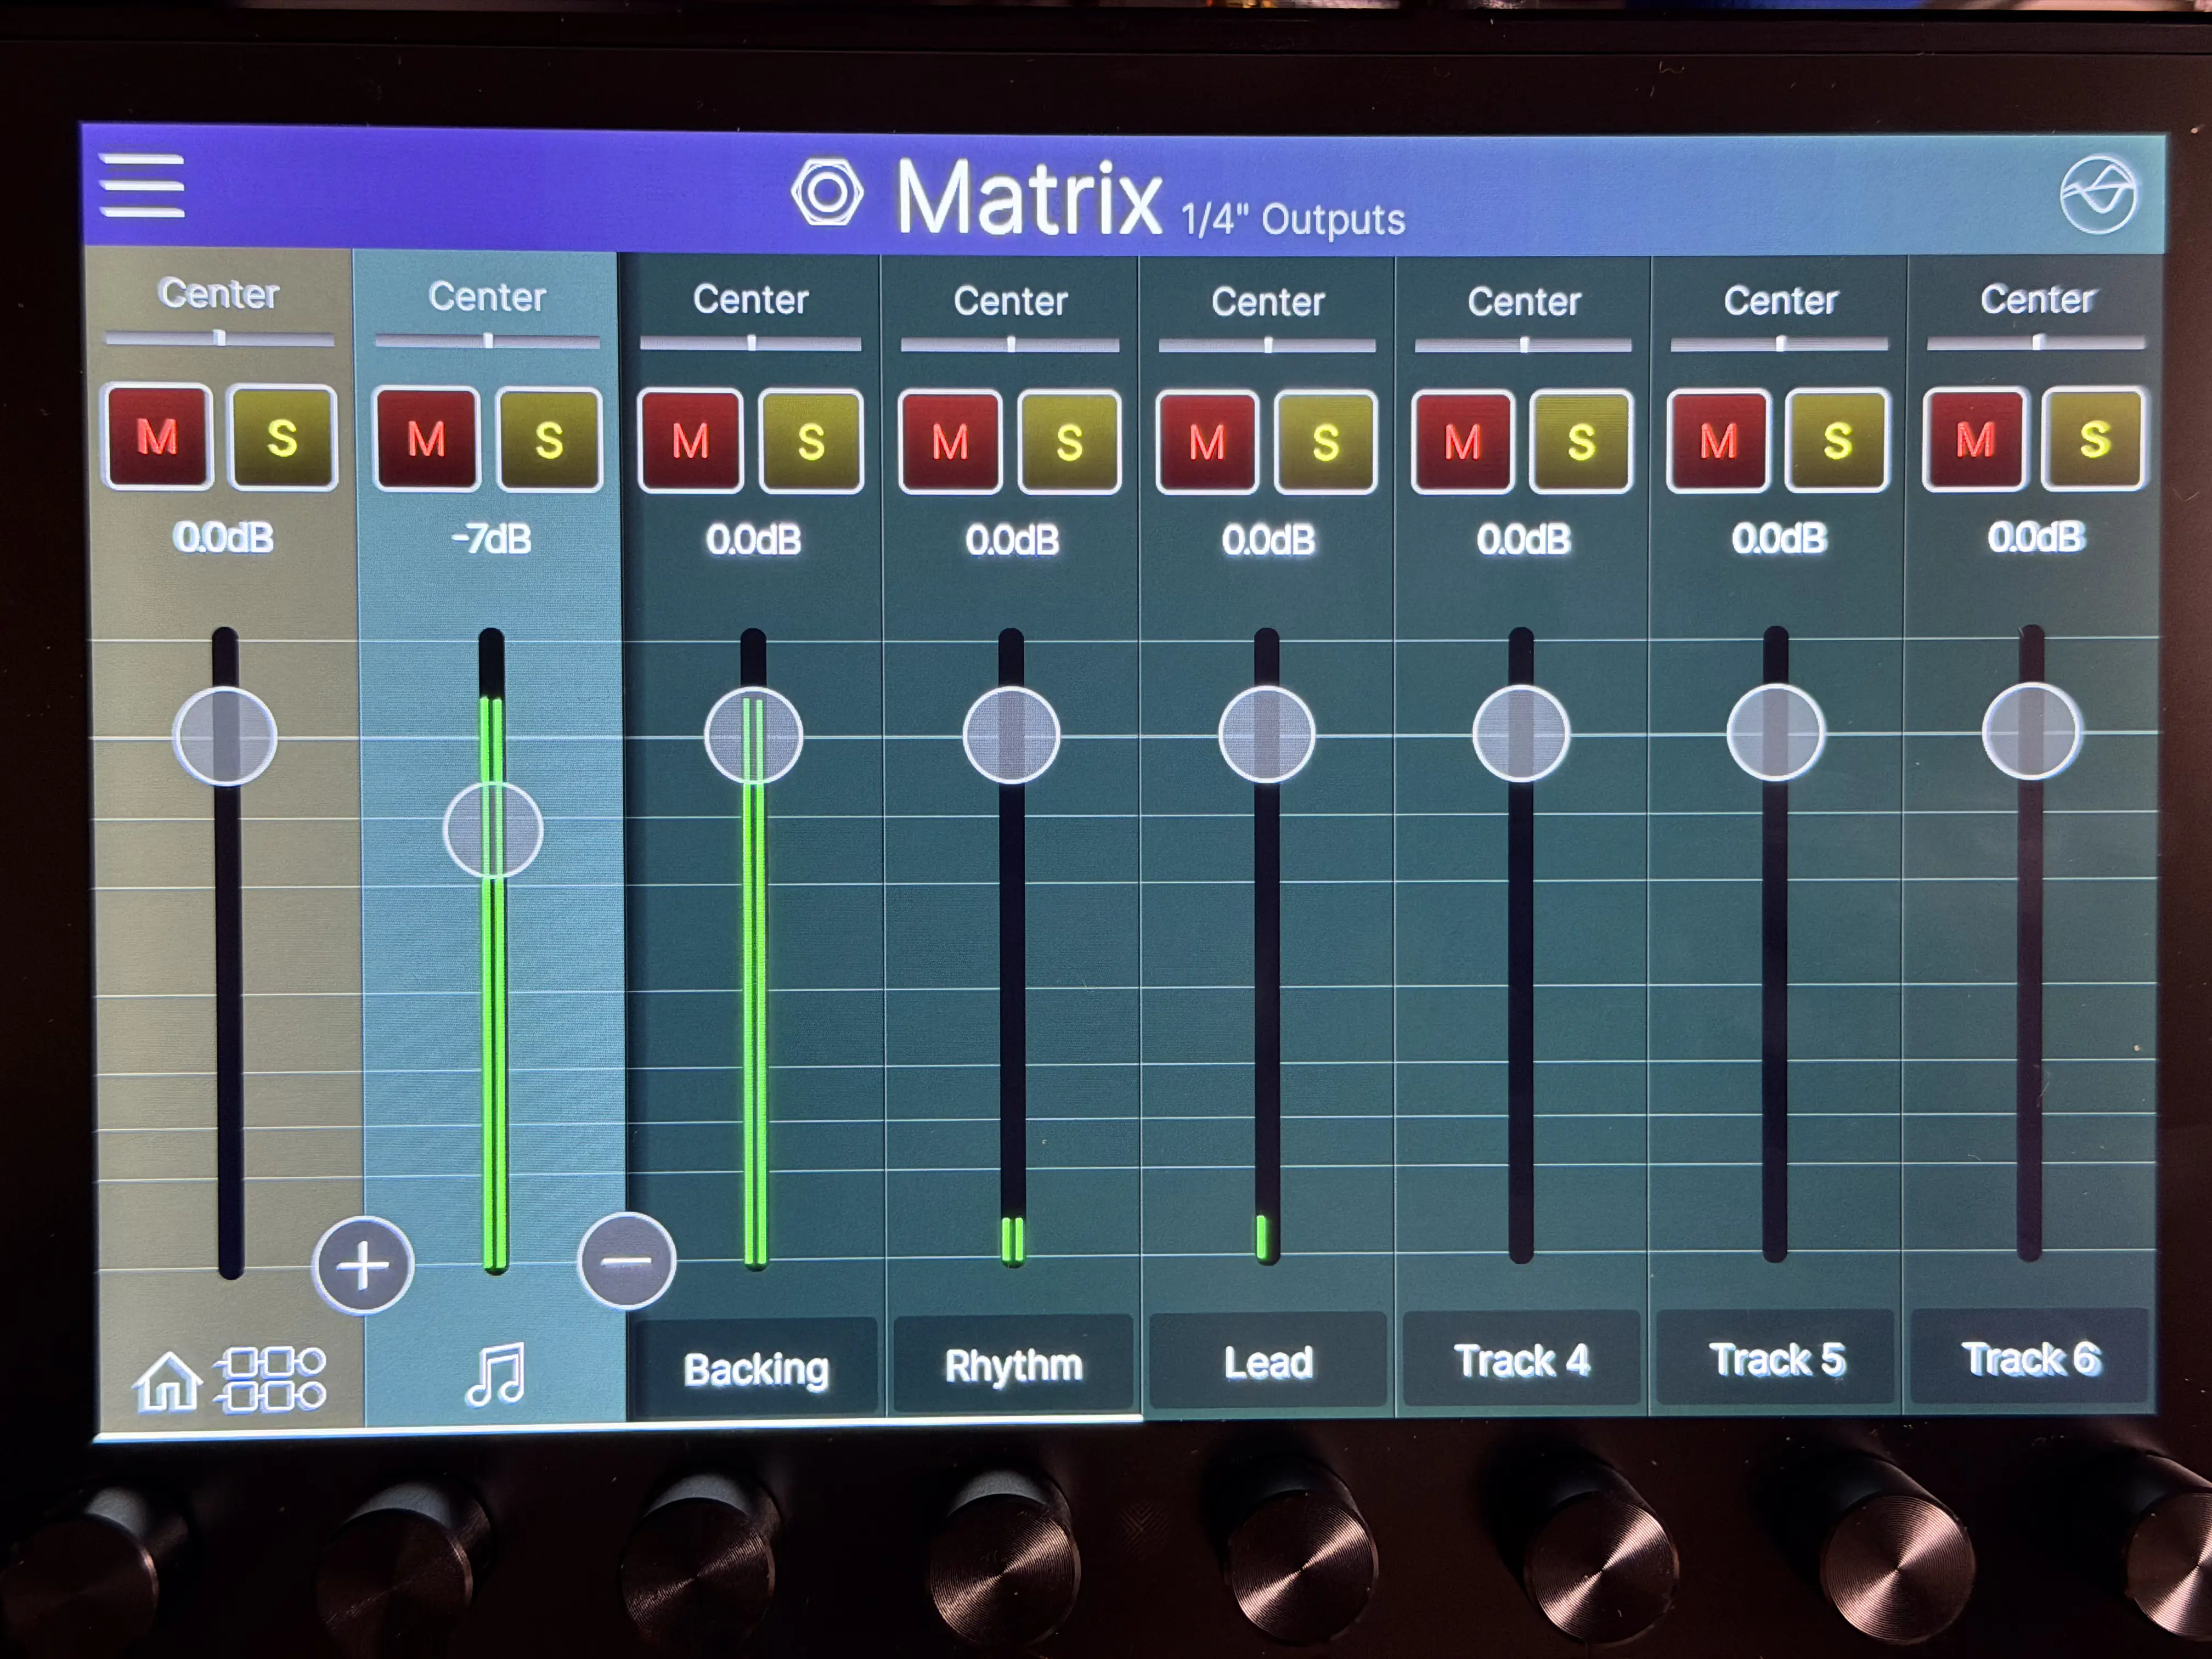
This setup is also how I make sure my presets actually sound right.
I’ll:
Mute my guitar tracks and listen to the recording
Bring my guitar back in and compare in real time
Adjust EQ, gain, compression, or effects until it sits right
Practice to the original recording
Practice in the correct key and tuning
Mute rhythm or lead guitars to play with the band
Isolate the rhythm and or lead guitar parts
Load the right preset and snapshot automatically
Here's how I level volumes across presets and snapshots, including appropriate volumes for rhythm and leads.
1. Install this free loudness meter: https://youlean.co/youlean-loudness-meter/
I use “loudness” instead of decibels since that’s how we/the audience perceive volume (and it’s a recording studio standard).
2. Get an external looper pedal (like the Acoustic Loop1 Looper Pedal) and connect it to guitar in on your helix/stadium.
Note: We need to use an external pedal to get clean droning of notes so we can be hands free to adjust volumes. We cannot use the looper in the helix since 1) that would require adding the looper to every preset and 2) it would include modeling/effects
3) record the following in your external looper: a 5-10 second loop droning on the open A string followed by a 5-10 second loop droning on the open G string. Pick as you normally would (the importance is consistent strength of the picking) - I chose to pick like the opening lick to the dick dale song misirlou.
We need A and G so we can measure the loudness for low and high notes (high notes tend to be louder).
4) open hx edit and the loudness meter.
5) switch to your desired preset and snapshot.
6) open the level of your preset’s final output and set it to snapshot mode
7) play the loop on your external looper and watch the short term and integrated levels.
Short term = the immediate levels.
Integrated = the average of levels over the last 5+ seconds
Tip: you can press the red X under the meter readings to reset the level readings
8) for rhythm snapshots, set the final snapshot output level to negative 22 LUFS.
For lead snapshots (solos, licks, etc), set the final snapshot output level to negative 18 LUFS (which essentially makes leads 4db louder than rhythm).
If you can’t get the level precisely at my recommendations, it’s fine to be .5 higher or lower on the integrated average
————————
FWIW - I determined the appropriate rhythm level by measuring the loudness of several factory helix/stadium presets of all different styles. I then set leads to 4db higher (seems to be my and Reddit’s consensus on lead volume) and remeasured.
Tip for co-guitarists: use the same helix/stadium setlists, set your helix physical master volume to the same, set the boards volumes to the same, set your guitar volume to maximum.
Final tip: I always add a 0-4db gain control to the expression pedal of every preset. This allows me to adjust on the fly if needed.
While you tap AMP to select the amp, you can also press and hold AMP to auto-select the cab. Press and hold AMP again to cycle to the next cab.
Community favorites in this category
If you've used the Helix Stadium XL with the Helix Stadium app enough then you probably and repeatedly ran into this frustrating problem - The connection isn’t always reliable:
Sometimes it disconnects.
Sometimes it won’t reconnect.
Sometimes it only comes back after restarting the app or power-cycling the pedal.
Sometimes it works perfectly… until it doesn’t.
StadiumBridge is what I call my DIY practical workaround that improves reliability by changing how the Stadium XL connects to your network — without relying on its internal Wi-Fi.
StadiumBridge avoids the internal Wi-Fi path entirely.
Instead:
A small external Wi-Fi bridge handles the wireless connection
That connection is converted to Ethernet
The Stadium XL only sees a wired network interface
The Stadium’s internal Wi-Fi is disabled
From the pedal’s point of view, it’s just plugged into Ethernet — which tends to behave more predictably. You still connect to the pedal wirelessly through the Helix Stadium app.
This alone significantly reduces disconnects and makes reconnection far less painful.
You may still need to restart the Helix Stadium app occasionally
You may still need to reboot the pedal sometimes
Saving or editing can feel a bit laggy at times
This is not a guaranteed, foolproof fix
But compared to relying on internal Wi-Fi alone:
Disconnects happen less often
Reconnects succeed more reliably
The setup is far less temperamental
For me, that’s a big win.
Here’s exactly whats needed to build your StadiumBridge:
https://www.amazon.com/dp/B0C167WM5D
https://www.amazon.com/dp/B09GRL3VCN
https://www.amazon.com/dp/B014SK2H6W
Yes its slower but I intentionally bought this version because::
2.4 GHz for range and consistency
Cheap hardware
If you want to upgrade to a nicer or faster bridge later, you can — the concept stays the same.
Plug the USB splitter into the Stadium XL
Connect the Wi-Fi bridge to the splitter’s power side (white connector)
Connect the USB-to-Ethernet adapter to the splitter’s data side (black connector)
Connect the bridge Ethernet cable to the the USB-to-Ethernet adapter
Optionally bundle up the wires (I used velcro ties, you can use zip ties or rubber bands)
Connect the splitter USB to the Stadium XL
Disable Wi-Fi on the Stadium
Reboot the Stadium XL
StadiumBridge is an ugly, practical workaround that makes connecting to the Helix Stadium XL wirelessly a little more consistent.
Sometimes “better” is more than good enough.
This is theoretical and untested, but based on the bridge’s specs, it should be possible.
The Wi-Fi bridge used in StadiumBridge supports AP / Hotspot mode, which means it can create its own SSID and hand out local IP addresses.
In theory, this would allow:
The Stadium XL to stay connected via Ethernet (as usual)
The bridge to create a local Wi-Fi network
A laptop or tablet to connect directly to that SSID
Wireless control of the pedal with no venue Wi-Fi and no internet
This would be especially useful at a gig. I use a Surface Go 2 tablet mounted on my stand while I play, and being able to control the pedal wirelessly from that tablet — without relying on any external network — would be ideal.
Important caveats:
This has not been fully tested
Performance may be slower than normal bridge mode
Best treated as a backup or situational option, not a primary setup
Stadium Showcase makes it easy to practice and dial in presets by letting you play full songs from your pedal, mute all the guitars and play the whole song yourself, mute just the lead or rhythm guitar to work on specific parts, and automatically switch presets and snapshots so you can stay focused on playing and tone.
Here’s how I do it, step by step.
First thing you need is the song as an audio file. Pretty much anything works as long as it’s a real audio file you can upload later.
Stadium and Moises can work with:
MP3, WAV, FLAC, M4A, MP4, MOV, WMA
You already have it
If you’ve bought the song or already have it in your library, you’re good.
Rip it from a CD or other physical media
Old-school, but still one of the cleanest ways to get high-quality audio.
Rip it from YouTube or streaming services
A lot of people use third-party ripping sites or software to grab audio from YouTube or streaming platforms.
Common methods:
YouTube ripping websites or desktop apps
Streaming service rippers
Video-to-audio converters
System audio recorders that capture what’s playing
For best results later, try to get the highest quality version you can. WAV or FLAC is ideal, but a good MP3 will still work.
Once you’ve got the song, the next move is breaking it into stems (ex. extracting the lead guitar track form the song) so you can control what you hear while practicing.
I use Moises.ai for this—it’s great, and like StadiumDepot (wink wink, please support this site), it’s a small monthly or yearly subscription that’s absolutely worth it if you like supporting good tools built by real developers.
Open the Moises desktop app
Use the desktop app, not the web version. The desktop app lets you transpose the song (ex. recording is in Eb but your band plays it in E) and export the corrected audio.
Start track separation
Click Track Separation and drag in your audio file.
Pick your stem setup
I usually choose:
1 vocal track
1 bass track
1 drum track
1 rhythm guitar track
1 lead guitar track
This separates into the 3 key tracks needed (backing track aka no guitars, rhythm guitar, and lead guitar).
Submit it
Hit submit and let Moises do its thing.
Now comes the important part—exporting the versions you’ll actually use in Stadium.
Set the key and tuning
If the recording is not in your desire key and or tuning, fix that now.
Export the backing track
Mute both rhythm and lead guitar
Export the mix as WAV
Export the rhythm guitar track
Solo the rhythm guitar (mute everything else)
Export the mix as WAV
Export the lead guitar track
Solo the lead guitar
Export the mix as WAV
Important:
Use Export Mix, not individual channels. That way the key change, tuning, and volume balances stay intact across all files.
Now you’re ready to get everything into Stadium.
Open the Helix Stadium app
Launch the app and connect to your Stadium pedal.
Open Showcase
Click the Song icon in the top-center toolbar.
Name the song
Keep it simple and recognizable—you’ll be scrolling through this on the pedal later.
Drag in your stems
Drop the WAV files into the Showcase window.
Sort the tracks
I like to keep them in this order:
Backing track
Rhythm guitar
Lead guitar
Click Transfer
This sends the song and all tracks to your Stadium.
Once that’s done, the computer is basically out of the picture.
I hit the Song button on Stadium, pick the song, press play—and that’s it.
From there:
I mute the guitar tracks and play along
I mute backing and rhythm to focus on lead parts
I solo rhythm and practice tight timing
I blend tracks to match rehearsal or live conditions
This setup is also how I make sure my presets actually sound right.
I’ll:
Mute my guitar tracks and listen to the recording
Bring my guitar back in and compare in real time
Adjust EQ, gain, compression, or effects until it sits right
Practice to the original recording
Practice in the correct key and tuning
Mute rhythm or lead guitars to play with the band
Isolate the rhythm and or lead guitar parts
Load the right preset and snapshot automatically
Here's how I level volumes across presets and snapshots, including appropriate volumes for rhythm and leads.
1. Install this free loudness meter: https://youlean.co/youlean-loudness-meter/
I use “loudness” instead of decibels since that’s how we/the audience perceive volume (and it’s a recording studio standard).
2. Get an external looper pedal (like the Acoustic Loop1 Looper Pedal) and connect it to guitar in on your helix/stadium.
Note: We need to use an external pedal to get clean droning of notes so we can be hands free to adjust volumes. We cannot use the looper in the helix since 1) that would require adding the looper to every preset and 2) it would include modeling/effects
3) record the following in your external looper: a 5-10 second loop droning on the open A string followed by a 5-10 second loop droning on the open G string. Pick as you normally would (the importance is consistent strength of the picking) - I chose to pick like the opening lick to the dick dale song misirlou.
We need A and G so we can measure the loudness for low and high notes (high notes tend to be louder).
4) open hx edit and the loudness meter.
5) switch to your desired preset and snapshot.
6) open the level of your preset’s final output and set it to snapshot mode
7) play the loop on your external looper and watch the short term and integrated levels.
Short term = the immediate levels.
Integrated = the average of levels over the last 5+ seconds
Tip: you can press the red X under the meter readings to reset the level readings
8) for rhythm snapshots, set the final snapshot output level to negative 22 LUFS.
For lead snapshots (solos, licks, etc), set the final snapshot output level to negative 18 LUFS (which essentially makes leads 4db louder than rhythm).
If you can’t get the level precisely at my recommendations, it’s fine to be .5 higher or lower on the integrated average
————————
FWIW - I determined the appropriate rhythm level by measuring the loudness of several factory helix/stadium presets of all different styles. I then set leads to 4db higher (seems to be my and Reddit’s consensus on lead volume) and remeasured.
Tip for co-guitarists: use the same helix/stadium setlists, set your helix physical master volume to the same, set the boards volumes to the same, set your guitar volume to maximum.
Final tip: I always add a 0-4db gain control to the expression pedal of every preset. This allows me to adjust on the fly if needed.
While you tap AMP to select the amp, you can also press and hold AMP to auto-select the cab. Press and hold AMP again to cycle to the next cab.